After turning on the tablets you can recognise the app by the aanmelder.nl logo. By default the app can be found on the dashboard/starting screen.

Load the event into the app (config scannen)
For security reasons the tablets are sent without any personal data stored on the tablets. You have to load this information into the app yourself. Open the app and click on the blue "scan config QR code". Now you can scan the configuration QR-code (config) you received by email from the event consultant.
The event is then loaded into the tablet. Please note that there needs to be an internet connection (wifi or 4G) to do so. The app synchronises with your aanmelder event as long as there is an internet connection.

Chosing a printer
After you have scanned your config, you will be directed to a screen where you can connect the tablets to a printer. Select the number of the printer you want the tablet to connect to and click on the blue "play" button.
Are you not using printers? You can click on the blue button without selecting a printer.

Switching between participant groups
Check-in group - multi-day event
Are you organising an event during multiple days? Then it might be nice to know which participant checked in on which day. Do you want that? Let us know, so we can set up different groups/days, which will be visible on the tablet. As soon as a check-in group is created, a drop-down menu will become visible in the app under "Checked-in" and you can use the desired group. Please pay attetion that you check-in participants on the right day.
Check-in group - subsessions
If you have let your event consultant know that you want your participants to be checked in at different locations or that you want different participant groups during different days, a drop-down menu will be visible on the home screen. Through this menu you can select the location/day you want a participant to be checked in. Always make sure you have selected the right location/day before starting the check in.
This is how the drop-down menu looks in the app:


Checking in participants
After having loaded the event on the tablet (and having chosen a printer) you will be directed to the home screen of the aanmelder Check-in app. From here you can check in your participants.

You can check in participants in three different ways:
1. Through scanning a personal QR-code
2. Adding a participant, who has not yet been registered, by hand
3. Checking in a participant by hand through the participants list.
- The fastest way to check in participants is by scanning the personal QR-code of a participant. This code can either be printed or be on a phone or tablet screen. By clicking on the blue "scan QR-code" button, the scan mode will be started. Show the QR-code as clearly as possible so that the camera focuses on it automatically. The QR-code will be scanned and the camera will be dimmed while waiting for the next participant. Once you are ready for the next participant, click on the "scan QR-code" again to continue. By clicking on the return button (arrow to the left) you will leave the scan mode. You can also activate successively scanning so that you won't have to click the scan button continuously.
- Participant that has not yet signed up but would like to join your event? You can add participants manually by clicking on the yellow "add manually" button. Name, surname and email must be filled in for a succesful registration. With the "add manually" button a participant will be added to the participants list and get checked in. Click on the enter button to get to the following box to fill in all the information, at the end click "okay" and "add manually" to finish the adding process.
- By clicking on the pink "Participantslist" the list of participants will be shown. The list is filtered by name and surname. Participants shown in blue and with a check mark are already checked-in while participants in black are not yet checked-in. It is also possible to sort the list by checked-in/not checked-in participants. By clicking on a name you will be shown the personal information of that participant. Here you can also check in a participant manually or check them out again. It is also possible to change the personal information of a participant here if they are not correct. By clicking on the little pen icon on the top right (
 ) the information will be editable. You can leave the edit mode without saving by clicking on "cancel" or save the edit by clicking on "save". After saving the participant will automatically be checked-in.
Connection with printer lost
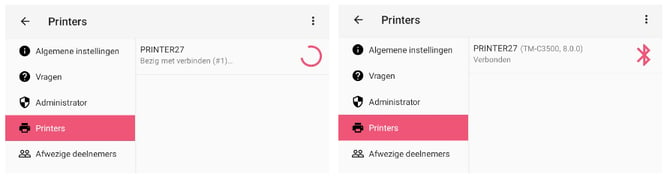
If you want to (re)connect a tablet with a printer, go to the settings menu (at the top right of the home screen) and chose "printers". Here all available printers via bluetooth will be shown. The bluetooth connection works in a radius of approx. 10 meters. Click on the printers you want to make a connection with, confirm and wait until it says "connected". If the message reads either "connecting" or "connected; setting up printer" the connection is not yet ready. It can take some time for the printers to be connected.
Deleting the event from the tablet afterwards
Because of privacy regulations the events have to be removed from the tablets before you send them back. To delete the event from the tablet go to the "settings" menu (at the top right of the home screen) and chose "administrator". Here you can chose the option "delete event". This will delete all the information from the tablet. The information will still be stored on your account.

.webp?width=250&height=400&name=WhatsApp%20Image%202024-03-12%20at%2011%20(1).webp)
Reload Config
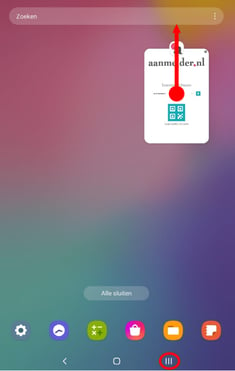
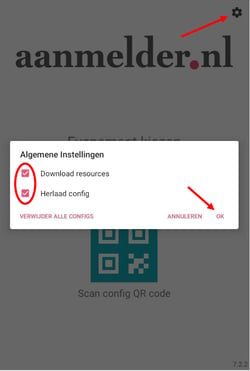
It is possible that the Event Consultant makes changes in the configuration after you have already loaded your event into the tablet. In that case the config has to be reloaded. To do so you have to completely close the app. Click on the three vertical lines in the navigation bar at the bottom of the screen to open the task manager. Swipe up on the app to completely close it. Open the app again afterwards. On the very first page ("chose event") click on the settings icon at the top right. Check both "download resources" and "reload config* and confirm by clicking on "OK".