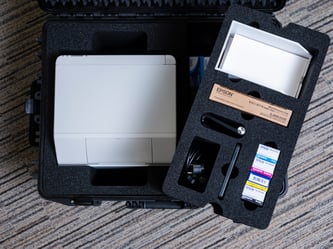
Wat is inbegrepen?
De volgende apparatuur is inbegrepen:
- Badge printer
- Badge houder & opvangbak
- Printer maintenance box
- Printer inkt
- Tablet
- Tablet houder
- Kabels & oplader
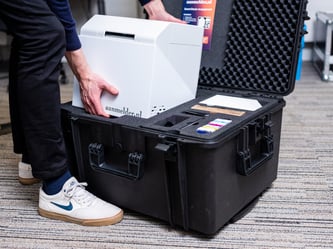
Til en draag de printer aan de voorkant bij de uitstekende rand en aan de achterkant, zoals weergegeven op de afbeelding rechts.
Opstarten van de printer
- Begin met het uitpakken van de printer (1) en plaats deze op de check-in balie, met de voorkant (met de aanmelder.nl-sticker) van de gasten af gericht.
- Sluit de printer aan door de zwarte stroomkabel uit (7) in de zwarte stroompoort te doen.
- Houd de aan/uit-knop van de printer (linksboven op de printer) ingedrukt terwijl je de zwarte netschakelaar op '-' zet. Je hoort de ventilatoren van de printer opstarten en op het scherm verschijnt de melding ‘initializing’. Het kan zijn dat er een andere foutmelding verschijnt, deze kun je voor nu negeren.
- Pak de badgehouder en -opvangbak (2) en plaats de badgehouder tegen de achterkant van de printer.
- Installeer de badge opvangbak aan de voorkant van de printer door licht op de zijkanten ervan te drukken. Je kunt deze daarna uitschuiven door de donkergrijze hendel uit te trekken, het uiteinde uit te schuiven en de grijze hendel weer terug te duwen.
- Zodra de printer klaar is met initialiseren, kun je de badges plaatsen. Open hiervoor de klep aan de achterkant van de printer en voer de badges in met de stickers naar boven gericht. Hiervoor moeten ze licht aangeduwd worden; daarna trekt de printer ze automatisch naar binnen. Wanneer de eerste lege badge aan de voorkant verschijnt, kun je deze afsnijden door op de knop‘cut’ te drukken.
Voor meer informatie over de printer, en de foutmeldingen die je kan tegenkomen, zie het volgende artikel "Foutmeldingen op de printer".
Het initialiseren van de printer kan enkele minuten duren; in de tussentijd kun je beginnen met het instellen van de tablet.
Opstarten van de tablet
- Pak de tablet (5) en zet deze aan door de aan/uit-knop aan de zijkant ingedrukt te houden. Pak ook de tablethouder (6) en klap deze uit. Deze kan gebruikt worden om de tablet op te plaatsen wanneer deze niet in gebruik is.
- Zodra de tablet is ingeschakeld, open de aanmelder.nl Check-in app door op het app-icoon op het startscherm te drukken.
- Druk in de app op ‘Scan config QR code’ en scan de QR-code in de PDF van jouw evenement. Hiermee wordt jouw evenement op de tablet geladen.
- Nadat het evenement is geladen, selecteer de printer waarmee je wilt verbinden en druk op de blauwe pijlknop om verder te gaan. Hiermee kom je op het hoofdscherm van de app.
- Is het bluetooth-icoon rechtsboven wit, dan is de tablet verbonden met een printer en kun je deze stap overslaan. Zo niet, open dan de instellingen in de app (het tandwiel icoontje rechtsboven) en ga naar 'Printers' om een printer te selecteren.
- Wacht totdat de app de melding ‘printer is verbonden’ weergeeft of totdat het bluetooth-icoon wit wordt. De tablet en printer zijn nu met elkaar verbonden.
Voor meer informatie de aanmelder.nl Check-in app, zie het volgende artikel "Event Check-in app handleiding".
Een testbadge printen
- Zodra de tablet is verbonden, navigeer in de Check-in-app naar instellingen (het tandwiel icoontje rechtsboven) en dan het tablad ‘Administrator’ en klik op ´Test badge´ . Hiermee wordt de deelnemer die geprint word, niet ingecheckt.
- Word de badge wel geprint, maar is de afdrukkwaliteit slecht of zijn de kleuren niet correct, druk dan op de knop ‘cleaning’ om de printer te laten reinigen. Dit proces kan enkele minuten duren.
- Als de badge niet wordt geprint, controleer dan of de tablet en printer zijn verbonden en of de printer geen foutmeldingen geeft (zie "Foutmeldingen op de printer"). Start indien nodig de Check-in app en de printer opnieuw op. Blijft het probleem bestaan, neem dan contact op met jouw aanmelder.nl contactpersoon.
De apparatuur inpakken
- Zodra het evenement is afgelopen, navigeer in de Check-in-app naar instellingen (het tandwiel icoontje rechtsboven) en dan het tablad ‘Administrator’ en druk op ‘Event verwijderen’. Hiermee zorg je ervoor dat er geen deelnemersgegevens op de tablet achterblijven.
- Schakel vervolgens de tablet uit door de aan/uit-knop ingedrukt te houden en ‘power off’ te selecteren.
- Houd de aan/uit-knop van de printer ingedrukt tot alle lampjes uit zijn. Zet vervolgens ook de zwarte schakelaar op 'OFF' en haal de stroomkabel los.
- Verwijder de badge opvangbak en schuif deze weer in door de grijze hendel uit te trekken.
- Trek aan de grijze hendel aan de voorkant van de printer om deze een klein beetje te openen. Verwijder de badges aan de achterkant door deze eruit te trekken en doe de printer daarna weer dicht.
- Plaats tot slot alle apparatuur terug in de daarvoor bestemde vakken in de koffer, zoals weergegeven op de eerste afbeelding van dit artikel. Zorg ervoor dat de printer met de zijde met de sticker naar de deksel van de koffer is gericht.
Belangrijk: Bewaar de koffer met apparatuur altijd met het deksel naar boven; dus niet op de zijkant(en). Anders kan dit voor technische problemen zorgen.